Showing posts with label Teufel. Show all posts

Saturday, March 19, 2011

Koos Mobius Spiral Scarf

by Linda Chang Teufel

IMG_3230


This is an really fabulous project. It’s a unique mobius scarf in that it doesn’t have a long straight seam, rather a long spiral seam. It is ingenious construction, as you might expect from Koos. Once you make one, you’ll want to make it again out of different weights of fabrics.

The picture at the top of this post is of the two that Koos made for me. The blue one is made of 4 different widths of silks pieced together on straight grain to form the base rectangle. That is then attached to very thin batting. The black scarf is wool jersey with dotted wool jersey strips and rayon brocade strips on top. There is no batting on this version. Here’s me in one I made for a friend:

IMG_3236

Consider the paper tube on the inside of a paper towel roll as you’re putting this together. That’s what I did when I was figuring out the construction. (Who knew cleaning your kitchen could be so useful?) I’m going to walk you through a scarf I made using using Japanese cottons on shantung with no batting.

First, let’s study a humble paper towel roll:

IMG_3126

The inner tube is a spiral roll which when twisted becomes a mobius strip. I tried out my construction on muslin first until I figured how to piece this all together.

Width and length measurements are approximate. Use this as a rough guideline:
Width 24-30”
Length 60-70”
For my version I decided on a 25”x70” cut size.

IMG_3231

This was another of those projects that had me digging through my stash, visiting my old fabric friends. I chose a number of coordinating fabrics:

IMG_3103

Let’s get started!

1. Cut a base fabric of approximately 25”x70”. All seams will be either 1/4” to 1/2”. You decide.

2. Place some strips of coordinating fabric on the base fabric. My strips were 3”-5” wide. Stitch down, close to the edges.

3. Cut, then make some binding. It doesn’t have to be bias since it is a straight line. I used the Clover tape maker to make two different 1/2” bindings.

IMG_3119

4. Sew the bindings over the raw edges of the strips, covering the stitches. This is the finished rectangular base. Here’s what you should have so far:

IMG_3142

5. Now, place this base wrong side down. Fold up one edge 90 degrees as shown here:

IMG_3150

6. Fold the other end (top) down at an angle so that it lines up with the first side:

IMG_3154

7. Pin in two places to hold edges in place with cut edges matching and right sides together:

IMG_3160

8. Start sewing from that point to the end, making sure cut ends are lined up on top of each other. Stop when you are about 3” from the end.

IMG_3192

9.  Turn it around leaving a 5” space unsewn. This will be the “turning opening”. Sew the rest of the length, stopping a few inches from the end again.

IMG_3203

10. Press the seam open, then pull it right side out through the ends.

11. Lay the scarf flat on the table and put one 24” end over the top of the other end with right sides together. Pin.

IMG_3212

12. Stitch across the ends.

IMG_3217

13. Turn this inside out through the turning opening. Resume sewing the rest of the spiral seam through those ends. Pull this right side out through the turning opening.

14. Invisibly hand stitch the opening closed. VOILA! Your own designer scarf.

A quick note: You can piece your fabrics into a base rectangle using slightly wavy lines too. Cut them into slight curves and stitch them down. If you do this you’ll need bias cut tape for the gold edge trim. Good luck!

IMG_3250

Sunday, March 6, 2011

Wildflowers Quilt by Smith Street Designs

wildflower1

Here is the one and only block-of-the-month quilt that I've done...or ever plan to do! 

Every month I received packs of batiks to go with a wildflower embroidery pattern. I loved the idea of combining embroidery applique designs in this beautiful pattern, so I gave it a try. Here are some close-ups of my work.

wildflower2

wildflower3

wildflower4

For a while I was keeping up. I dutifully did my block every month before the next packet arrived. But then this and that happened and next thing I know, a special drawer in my studio (I need to post a picture of the many special drawers in my studio) was devoted to this project for years.

But it’s okay! This winter I decided I was going to get back on that wildflower quilt horse. I pulled it all out and finished the embroideries on several blocks then sewed it all together at my guild's sew-in one weekend.

This week I got more fabric and created the borders with little one inch square colored blocks. Putting this all together became fun, like visiting an old friend.

The hardest part for me is yet to come. How to quilt this top?  I know I'll put it on the Handi-quilter rental at my local store and do something. Next week I have my dear friend and award-winning quilter Philippa Naylor as a houseguest. I’ll pick her brain and get some expert advice before I make another stitch.

I'll post a photo of the finished quilt with close ups of the quilting design. But don't hold your breath.

Saturday, February 5, 2011

Winter Knitting

Knitting might be off the topic of books and quilting, but great minds think outside the box. Great minds think about knitting scarves when they are surrounded by snow and ice.

For Christmas my boys got me two balls of mohair/silk yarn. That’s right. My boys bought yarn at the yarn store. And, yes, I might have sent them to my favorite local yarn store, and yes, I might have given them the pattern to take with them, but they chose the yarn and color by themselves. And yes, they did a great job.

The pattern was really interesting. I chanced upon it while browsing on Etsy.com (it’s part of a winter retail therapy program my health demands). This particular scarf really caught my eye. It was gorgeous and intriguing. I could not figure out the technique out from the pictures or product description. What could I do? BUY! Here’s a pic from the Etsy shop (VitalTemptation of Brooklyn NY):

And here’s a link to the listing: Shibori Style Felted Bobble Knit Scarf Pattern

I downloaded the pattern and Eureka! Those bobbles are so clever. So easy. I grabbed my needles and my yarn and started knitting. I’m not going to divulge the secret behind the bobble bubbles (It can be yours for $5.50 from the pattern author) but it is so, so nifty. Look at this close up from the Etsy site:

I think I'll look around etsy patterns more often.

Sunday, January 23, 2011

Winter Sewing

linda scarf

Is it cold where you are? Here in Ohio it is cold. (Can you tell from my picture that I am cold?) Cold, cold, cold. There’s snow. And cold. Did I mention the cold? Going anywhere is a chore. Will it ever be warm again?

I got so excited after our Jane Sassaman giveway that I decided to get creative Jane-style about protecting myself against the cold. A quick dig in my stash turned up some of her fabulous fabrics and some cozy polar fleece. I set to work on her Cozy Cowl Scarf pattern.

Not only does this scarf look great and keep my poor neck warm, but it took maybe only 2 hours to make. I have a beloved special Bernina foot that sews on buttons. Not only does this save time and sew on the button more securely, but it saves my cold fingers from having to touch a cold hand-sewing needle. Here are a few pictures of my work:

scarf 1

scarf 2

How about making a few of these for Christmas gifts next year? The possible fabric combinations are endless. I think I could come up with several hundred from my stash alone!

How about you? What about some ideas for gift sewing? Send me your ideas! I’ll post them in time to get started on your holiday sewing next year. Put ideas in the comment box below or email me at linda@dragonthreads.com.

Sunday, December 26, 2010

Dragon Threads Gift Workshop

For the second year in a row, my friend Vicki and I made Christmas presents for our dear friends. It feels GREAT! Of course, I couldn't post what I was doing before or our friends would know what they were getting.

Our projects didn’t take much time. We started organizing what we needed this fall, completing out our lovely gifts little by little. We didn’t feel pressured at all. In fact, these projects are a great way to use up some of that fabric you have in your stash. Believe me, that feels good, too.

We used a terrific (and free!) pattern from Beth Wheeler, changing just a little.  I made about 20 of these "padfolios". They honestly they don't take more than an hour or so to make. I had so much fun coordinating fabrics from my huge stash. It was surprising how many things went together perfectly. Here is the link to the project:

Padfolio by Beth Wheeler from the C&T Publishing Blog (a great source of neat project ideas). Here’s hers:


Here’s mine:

I made the following changes:

  1. I cut a 4" sq of fabric,pressed it on the diagonal and tucked it in the corner for a business card holder.  That is also where I attached my label.
  2. To cover the top of the pad of paper, I pressed a piece of steam-a-seam 2 about the size of 2.5" x 5.5" to the back of fabric, then cut it down to 2" x 5" and peeled off the paper backing and pressed it over the paper top of the notepad and folded it over to the back. I didn't like seeing the store brand name when I opened up the book.
  3. Also the zigzag were length of  0.4 and width of 3.0 for the first pass and then 3.7 for the second pass.

Here is the inside of mine (Sorry! The label is blurry):

inside portfolio

Vicki and I had such a good time these past two years that we’ve already started planning next year’s gifts, made and delivered of course with love. I

Last year’s project was a bag from an Indygo Junction pattern.

If you can’t recall from yesterday, here’s how they turned out:

colorful bags

Later this month I’m going to post a couple of good ideas to use as inspiration for next year.

Saturday, December 25, 2010

Merry Christmas from the Dragon Threads Elves

To all my wonderful readers, friends, quilters, and everybody in between, happiest of holidays!

I was a very busy elf this year, making lovely little portfolios and bags. I’ve been a busy elf this week delivering them.

More details to come in a blog post coming up but for now, back to the cookies.

Friday, October 22, 2010

Quilt Auction


A few years ago I when was writing the book, Quilting Party: Group Quilting for Celebration, Commemoration & Charity, my guild (at the time) was on a retreat. I thought this would be the perfect time to test out my quilt block system.

I chose two photos and divided the quilt group in half. There were 12 people in each group. We divided the photos (the photograph above is from Nantucket by my friend Vicki Rentel) into a grid of 12 blocks. Each person took one part and interpreted it in fabric. Because this group is so talented,the two pieced quilts came out beautifully!

Since these artists volunteered their time, I promised to donate one quilt to Kids N Kamp, a charity that lends support to families with children touched by cancer. Take a look at someof the quilts for sale this year. Every year this organization holds a quilt auction in the skybox area of the Ohio State football stadium. It's a ball. There's lots of great food; local celebrities and coaches do the actual auction. This year the auction is October28. I'll be there! I hope the bidding is high for my piece and all the other quilts.

Saturday, June 12, 2010

Do you Koos?

picture via wikipedia 

As my beloved readers know, I was in New York City a few weeks ago. While I was there, I stopped by to see Koos van den Akker at his studio. I love to see him, his assistants, and staff whenever I'm in the city. Like "The Big Apple", Koos' studio is vibrant, exciting, and thriving. Hanging out there is inspirational and fires up my creative juices. Koos is a dear, old friend, too, and I love having a chance to get caught up with him.

The next edition of Ornament Magazine (Volume 33 #4) should feature a six page interview with Koos. Look for that!  Koos fans--I might be #1--can't get enough of his clothes and vintage photos of his work. His designs and clothes are so interesting and never become dated; they are an exuberant and timeless mix of color, prints and fabrics.

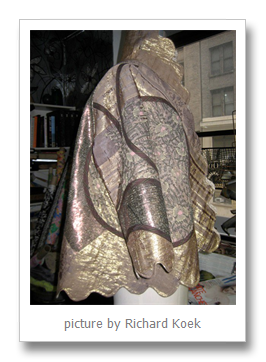
I was lucky enough to get a guided tour of what Koos is working on now. Among other fabulous items, this scalloped jacket is selling very well at his Madison Avenue boutique.  The inspiration from this came from a dear friend who was hospitalized. Koos wanted to make her a designer bed jacket!  Isn't this creation fabulous?


Koos keeps everybody up-to-date with projects via Facebook. Regardless of what you think about the Cosby sweaters (many of which were sold on Ebay for charity a few years ago) , check him out.


I wrote a book about Koos a few years ago. While I'm generally loathe to plug myself on the blog, there aren't many books about Koos around, and mine--Koos Couture Collage--happens to be on sale. Inspiring photos of his designs and sewing techniques in the back.

Koos has been designing patterns for Vogue for years. I decided a few days ago to list a few out of print ones from my stash. Oh my,I lost a few hours over the weekend trying to figure out how to list an item on Ebay. Contact me if there is a specific one you've been looking for. Later we will post a preview sneak peek at his new scalloped coat pattern for sale in October...it's to DIE FOR! Watch for it on this blog!

ShareThis

 
]